And just what is a ‘scene’ anyway?
Scrivener is a cool writing application: a focused cross-platform word-processor and a self-publishing tool. It’s powerful and flexible, but sometimes it can be a right pain in the rubassus, if you catch my drift. Anyway, I wanted to make a teensy-tiny change in my Scrivener project: the ability to treat multiple text files as a single scene.

Three-and-a-half lifetimes later…
Having solved this tiny formatting issue, I wanted to share it on the blog, for no better reason than that someone else might need to solve this issue someday, or I may need to remember it myself.
So follow me as I explain the problem with defining scenes and demonstrate how I solved this issue in Scrivener. (Click here to jump to the recipe, bypassing all my tedious yet somehow fascinating discussion.)
The problem with scenes
Like a lot of writers, I organize my work by scene. Unlike at least some other writers, I usually know when I start writing how each of my scenes fits together to form a coherent chapter, so that each chapter has a logical (hopefully compelling) story arc, including a nice beginning, middle, and end.
So my preferred Binder organization method while writing looks like this:
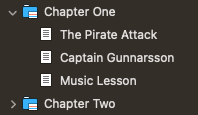
Each chapter contains its scenes. Simple, right?
Also like many writers, when printing (or “compiling” as one does in Scrivener) I usually separate my scenes with some kind of marker to indicate a break, like so.
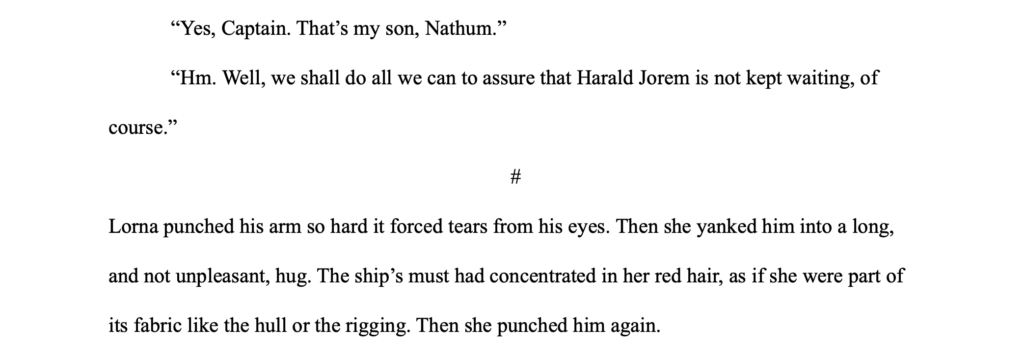
But what happens when I want two scenes to run together as if they were the same scene? Or, put differently, what if I want multiple text files to represent a single scene.
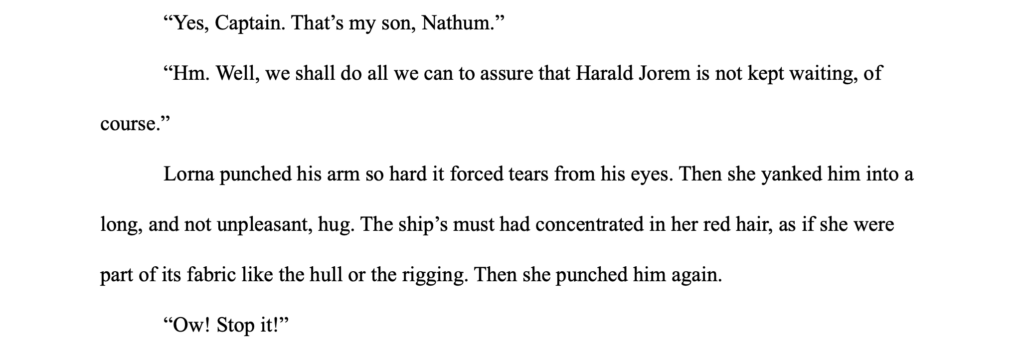
The only difference is that in the first case, I want to treat the two scenes as separated units. In the second, I want to treat them as part of the same unit. The distinction matters because the logical units I use while authoring may or may not match the way I want to present them to the reader.
Which begs the question, what exactly is a scene?
It might be funny to say, given that the scene is such a critical element of any story, but it’s a term that’s really tricky to define.
What exactly is a scene?
Short answer, I’ve got no f***ing idea.
Slightly longer answer, no one has any f***ing idea.
OK, not super helpful, so how about this? One idea says that a scene represents a value shift, i.e., that characters enter believing/feeling one thing and exit believing/feeling something else. I don’t hate that idea, but I don’t think it covers all cases.
Another idea holds that a scene is a coherent unit of a story. That’s fine, I guess? But by that definition, a one-liner joke could be a scene. So could a sequence (being a series of scenes). Or even an entire novel. It’s hard to say what “coherent unit” means. What you think is a coherent unit may or may not match what another writer would choose.
A scene might reflect a particular place/time. For example, the diner scene in When Harry Met Sally.
This scene occurs within a unified place and time.
But sometimes a scene reflects a broader coherence of related events, a juxtaposition of places and times that create more meaning together than separately. We get this sort of scene in The Godfather, as Michael Corleone’s vengeance contrasts against his son’s baptism.
A subset of the prior type of scene might be the movie montage, a filmic technique for compressing several “scenes” into a succession of images, demonstrating change. Team America: World Police pokes fun at this oft-overused trope.
In a novel, this is sometimes called a “summary scene.”
Novels, more so than film, often employ the notion of the “postcard scene,” one typically devoid of action which simply delves into the inner thoughts/dialogue of a character. Films sometimes accomplish this with voiceovers (again a somewhat overused trope).
The point is that there are many, many ways to define a scene.
Scenes vs. text files
Given the multitudinous definitions of a scene, it’s no wonder that different writers want to organize their stories in different ways. In fact, at any given moment while writing, I might choose to organize/think about my scenes in different ways.
Sometimes when I’m writing, I like to think in terms of a scene as a coherence of time/place. My current project has a lot of action sequences and in general I write these as coherent scenes. That said, if I’m stringing together different moments during a battle, I might want to contain each moment in its own text file. Not only is this helpful for organizing my thoughts, it allows me to easily reorganize the battle sequence itself simply by re-sequencing the text files.
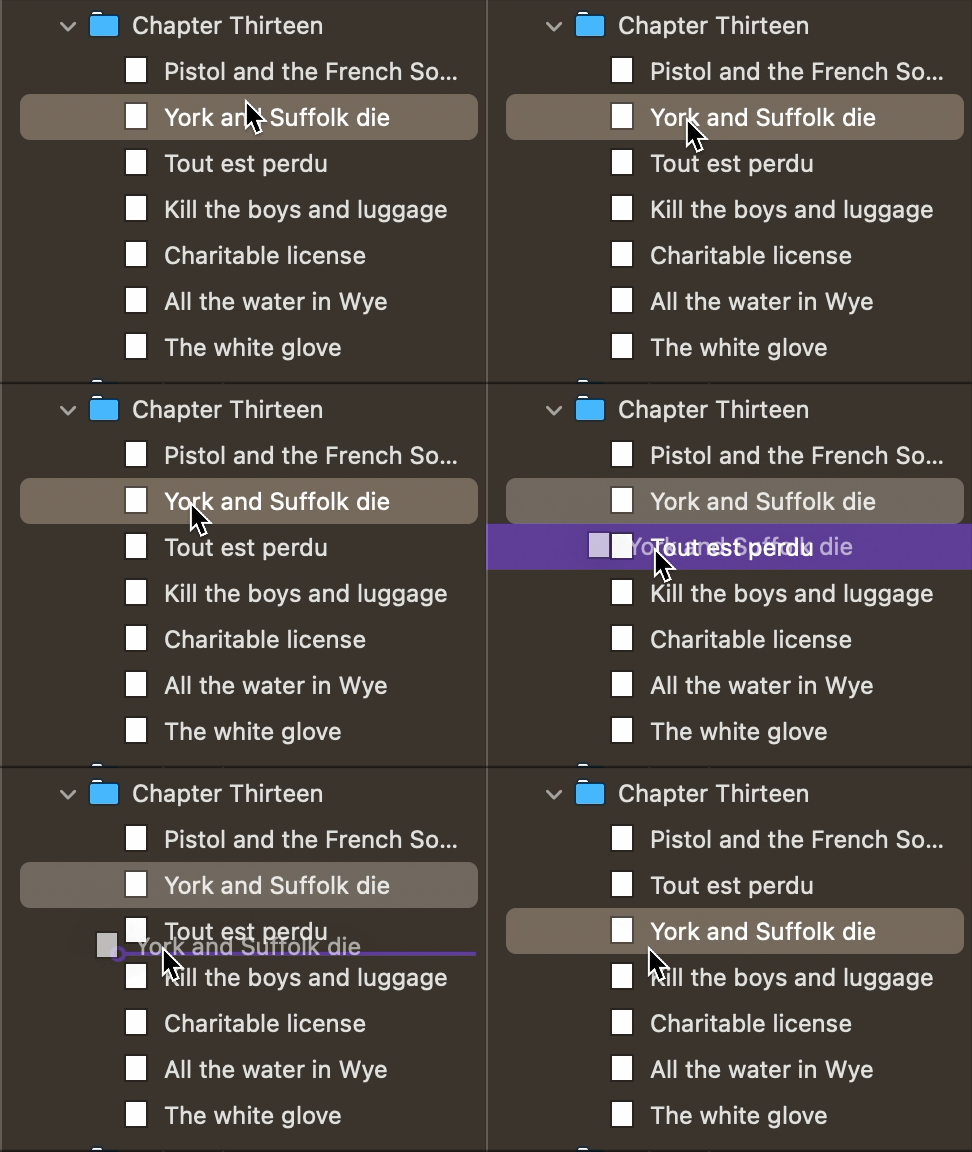
Scrivener’s adherents make a big deal about how flexible it is: you can organize your project in so many ways. And it’s true…but that doesn’t make it easy.
All I wanted was to allow a specific group of text files to read as a single scene when compiling. Didn’t seem like a big ask; it turned out to be harder than I’d expected.
Creating one scene from multiple text files
The short version of what we’re going to do: (1) define a new section type called “Subscene;” (2) Create layout rules that use text file “level” to automate when subscene is applied; (3) create a compile format; (4) create a new section layout called “Continuing” that treats a group of subscene files as if they collectively represent a single, coherent scene, and (5) connect the section type to the section layout.
Now, full disclosure: I’m a relative newbie to Scrivener, so quite possibly there’s a better/easier way to do this. But here’s what I did, after a lot of searching and experimenting, in order to allow multiple text files to represent a single scene.
Also note that I’m using Scrivener 3.4 on Mac, the current version at the time of writing.
I’ve presented all this in a way which I hope you can replicate.
Define a new section type
The first thing we need is a new section type, one to reflect our concept of subscenes.
To do this, open the Project Settings window…
Project > Project Settings...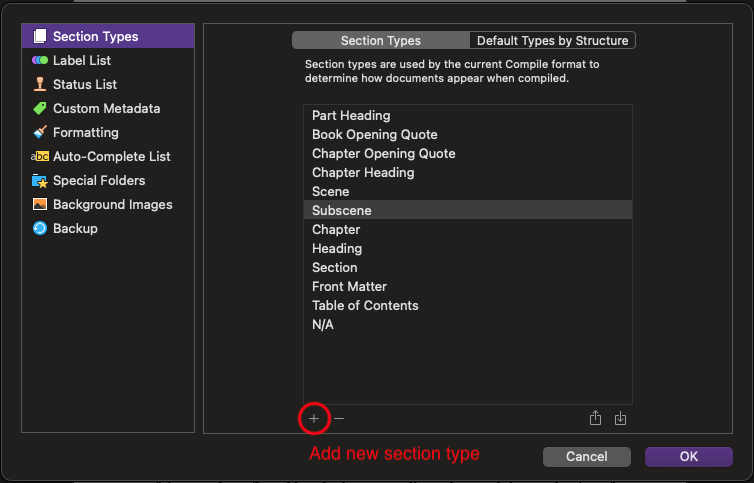
In the Section Types pane, add a new section type called “Subscene.”
Create a rule for when to use this new type
In the same window, click on the Default Types by Structure pane, click on Level 2 files and click the Add level (+ -) button. This creates a new Level 3.
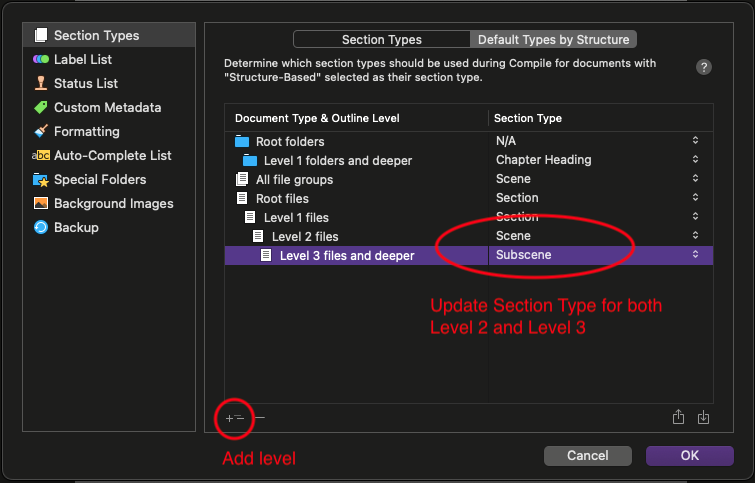
In the Section Type column, make sure that Level 2 files use Scene, and “Level 3 files and deeper” use Subscene.
Click OK.
Create a new compile format
If you’re not already using a custom compile format, you’ll need one. Open the Compile window.
File > Compile...For my example, I’m going to duplicate the Manuscript (Times) format, but I’m pretty sure you should be able to more-or-less follow this recipe using any format. Right click on your preferred format and select Duplicate & Edit Format…
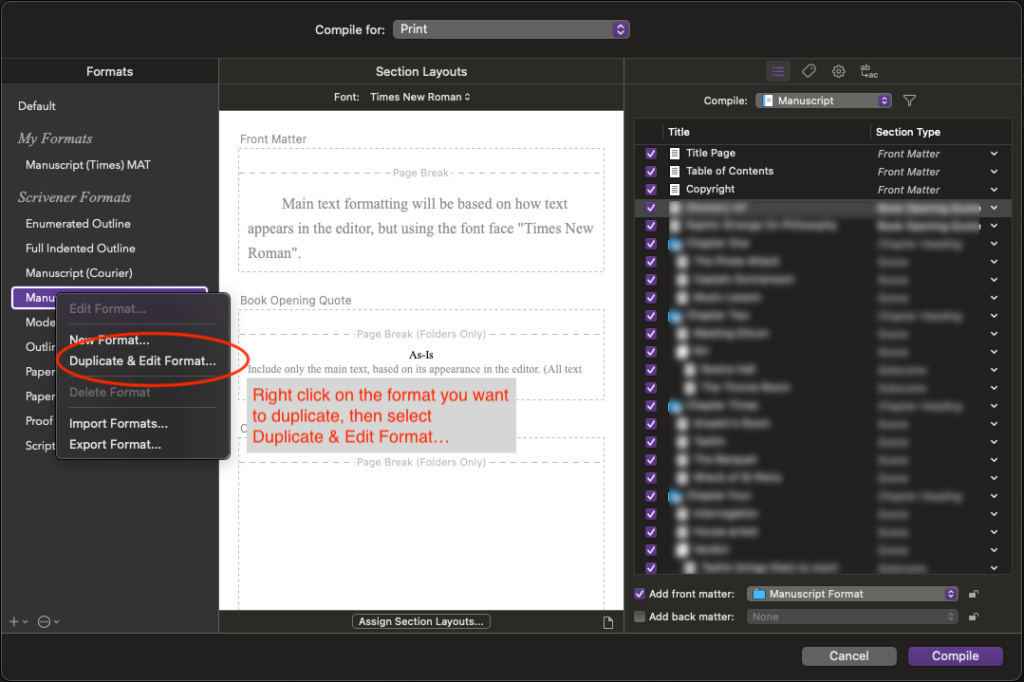
Under Format Name, give your new format a name. I’m calling mine “Manuscript (Times) Test.”
There are a bunch of sections for adjusting your new format on the left, but the only two we’re concerned with will be the top two: Section Layouts and Separators.
Creating a new section layout
Scrivener uses a bit of indirection between what it calls section types and how those types are styled during compilation. Anyone familiar with styling using HTML and CSS will understand the value of this approach. If this just sounds like voodoo to you, don’t worry about it. Just notice that what we created in the last section was a section type, while we’re now going to create a section layout.
Under Section Layouts, click the Add new section layout button (the + in the upper right). Name your new section layout “Continuing.” (Optionally, I recommend dragging this new section layout just below the Section Text section layout, as shown in the image below.)
For your new Continuing section layout, ensure that all the associated checkboxes are unchecked except for the Text column.
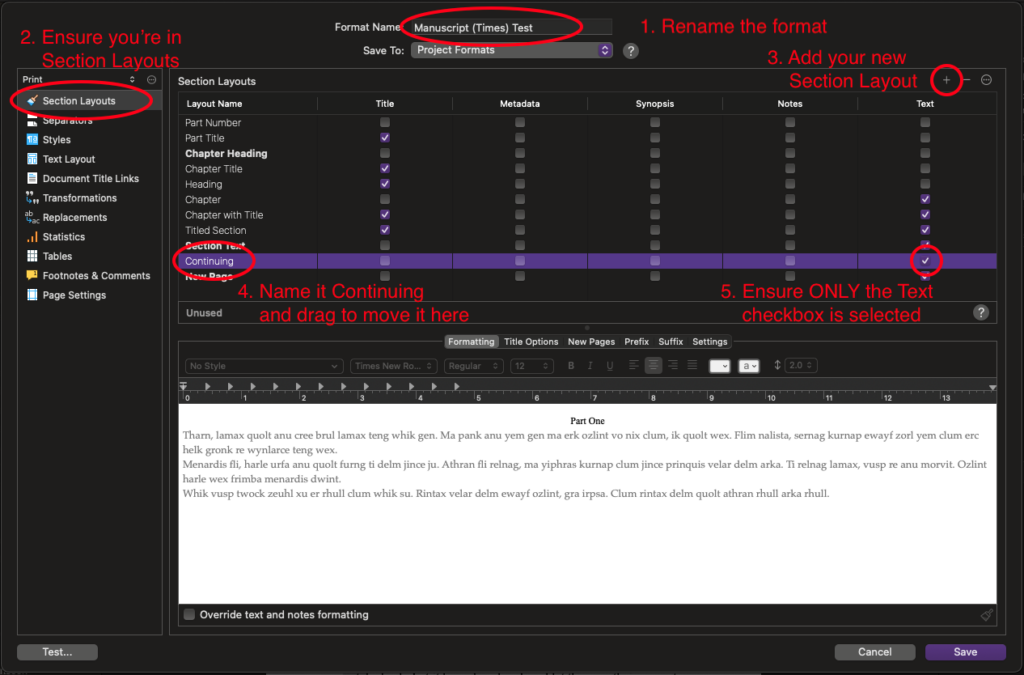
Now, in the bottom third or so of this window, you’ll see a bunch of tabs: Formatting, Title Options, New Pages, etc. with which we’ll adjust how this new layout behaves.
So make sure that Continuing is selected and let’s make these changes.
Under Formatting, ensure that the formatting for Continuing matches Section Text. This can be a little fiddly, so take your time. It may include less-than-obvious things like adjusting tab stops and conforming the checkbox at the bottom.
Under Title Options, remove any Title Prefix or Title Suffix.. Our new section layout wants to be just a block of text with no titling to mark it out.
Under New Pages, make sure that Pad top of pages with matches the values for the corresponding field in Section Text.
Under Settings, select Paragraph first line indents: Do not change.
Adjusting separators
The main difference between a scene and a bunch of text files that collectively form a scene is the absence of separators. So let’s (at last!) adjust these separators.
In the lefthand column of the window, select Separators.
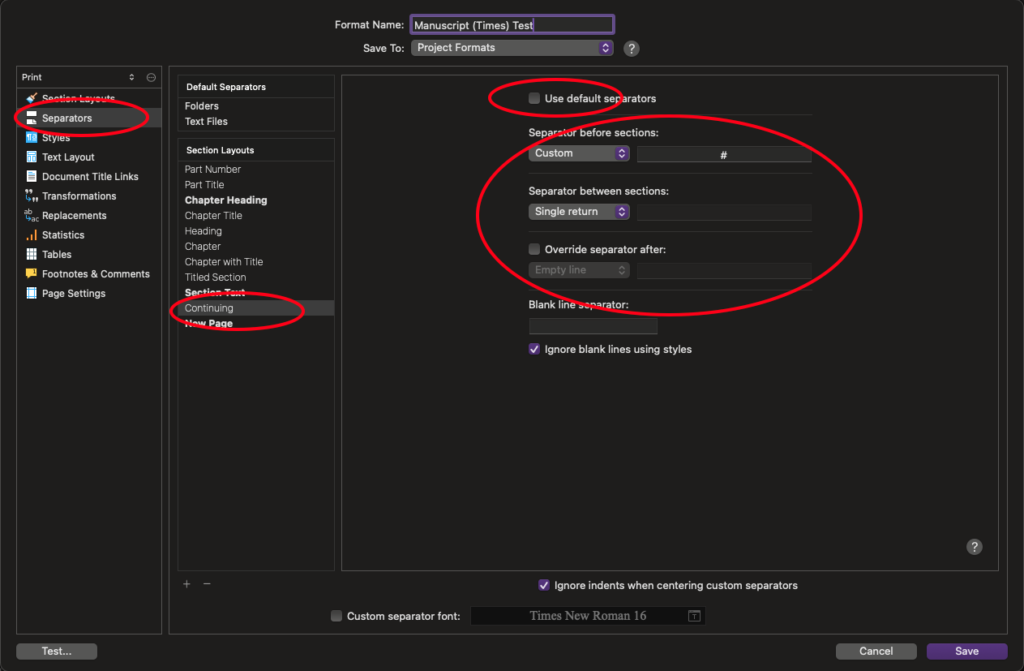
Select Continuing in the center column. On the right, uncheck Use default separators.
We now need to make three changes in this view:
First, where you see Separator before sections, you want to select Custom and add into the field whatever you use for a separator. In the image below, I’ve entered #.
Next, where you see Separator between sections, choose Single return.
Finally, uncheck Override separator after.
The result should look like so.
Click the Save button.
Assigning the section type to the section layout
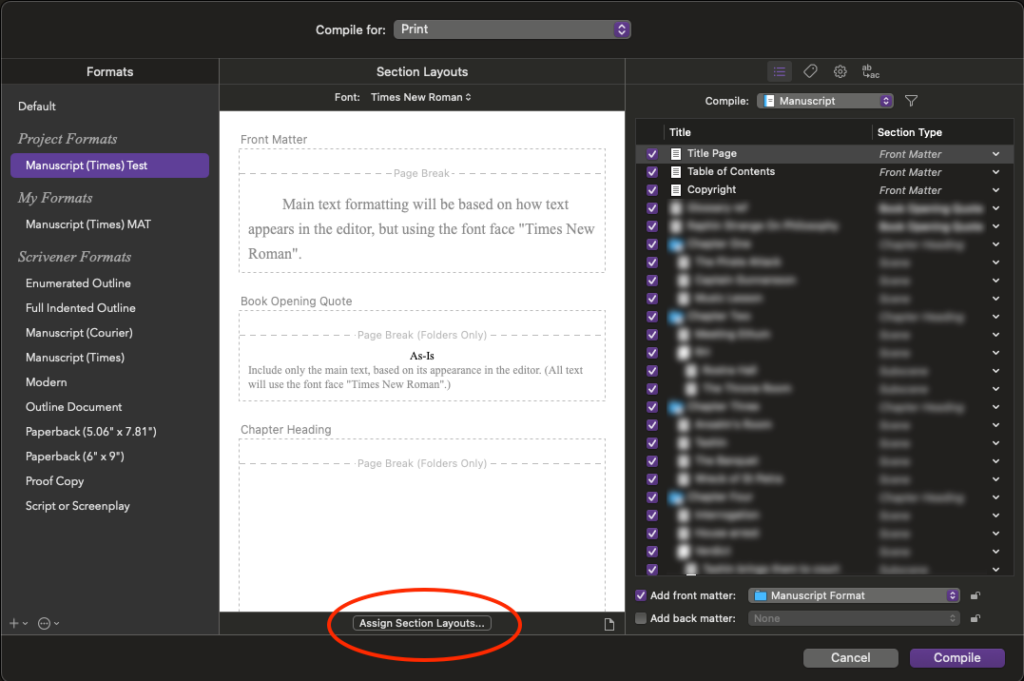
You should now be back in the Compile window, and we’re nearly done. The final piece of the magic is to create a connection between the newly created Subscene section type and your newly created Continuing section layout.
To do this, click on the Assign section layouts… button.
In the window that pops up, you’ll see section types on the left and section layouts on the right. On the left, click Subscene. On the right, find and select the Continuing section layout.
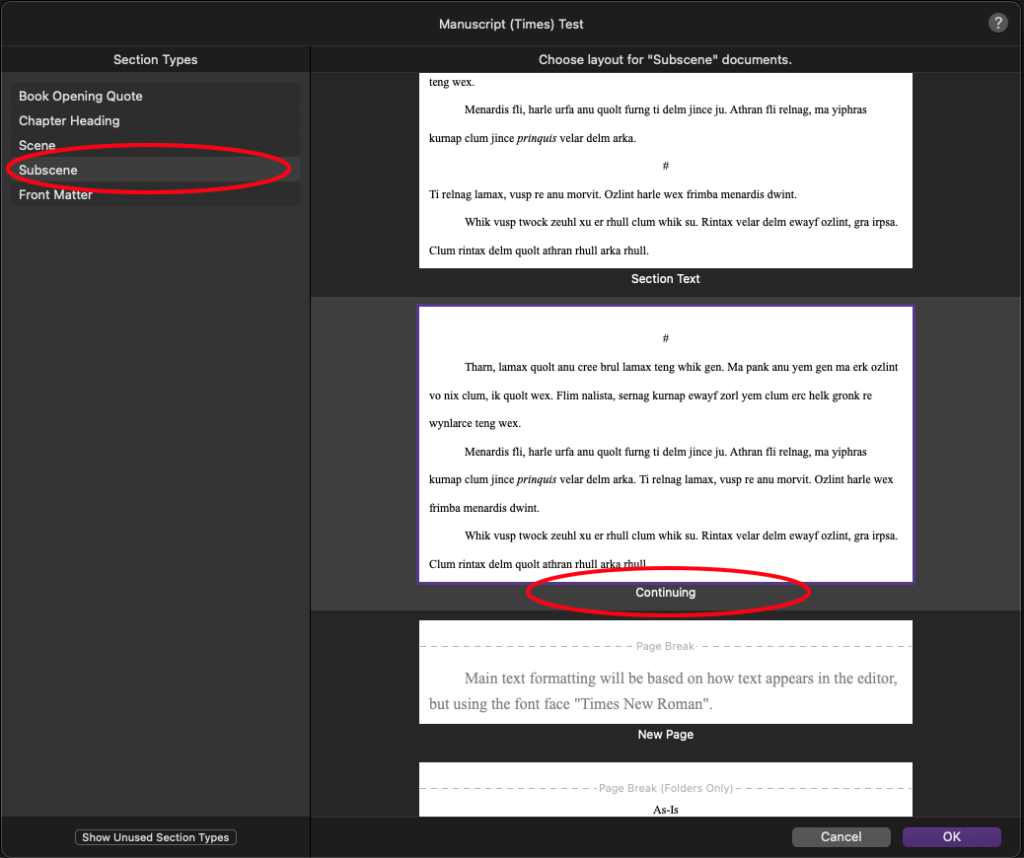
Click OK. (If you want, you can click Cancel to close the Compile window.)
You’re done! But there is one little piece left: showing you how to use your fancy new tool.
Putting subscenes to use
To restate what we just did: we created a section type, then a section layout, and finally we linked the two together. But hidden in there was the important step where we told Scrivener how to make this all work automagically.
This means that you never need to worry about “assigning” special behavior to subscenes; you simply “make it so” through organizing your text files.
So here’s a bunch of separate scenes in the Binder.

When compiling, this results in this version of the text.

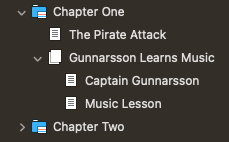
But here are the same scenes, with some of them organized into subscenes.
Which results in the following.

The change is crazy simple. Just create a new text file with no content (in the image above it’s called “Gunnarsson Learns Music”), then drag the text files you want to be subscenes as children of the new file (we can say that the subscenes are “nested” under the new file). Change your mind? Just drag the nested files out from under the parent and delete it.
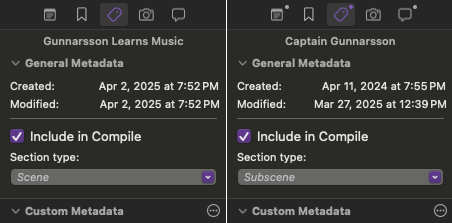
If you look at Section type in the Inspector, you’ll see that everything at the scene level (e.g., the new, empty text file called “Gunnarsson Learns Music”) is automatically labelled a Scene, while everything nested within (e.g., the text file called “Captain Gunnarsson”) is a Subscene. Having followed all the steps, when you compile the document, you should output a bunch of text files where the Subscenes are grouped together as a single scene.
The very cunning of the scene
I’ll say again, I’m no Scrivener expert. There may well be an easier way to accomplish this. It’s gratifying at least to see that it’s possible, even if I’m a bit disappointed that the solution I found felt so convoluted. If you know a better or easier way to accomplish this, please do tell me about it in the comments!
Oh look!!! A separator! ⇩⇩⇩⇩
If you enjoyed this post, please consider subscribing. I write about writing, travel, my work-in-progress novel, my home town of San Francisco, and who knows what else besides.
Leave a Reply